In the first post from this series – Scaling OpenShift compute (worker) BareMetal nodes – Part 1 – I explained the fully automated process of OpenShift baremetal node bootstrap using out-of-band-management (OOBM) interface and virtual media functionality. While it is very convenient and time efficient, sometimes it does not fit to the environment where the cluster is running. For an instance there may be a firewall between the cluster and OOBM network which prevents communication between OpenShift‘s Metal3 components and baremetal servers’ management consoles. In such case Metal3 duties in regard to servers power management are delegated to… a human being 😉
Luckily OpenShift can provide valuable help in getting new node provisioned even manually. However the documentation about it is a bit unstructured and somewhat hard to follow, unless you know what you’re looking for. And for that reason I decided to gather all the information I gained and put it into a single blog post.
Few assumptions.
I assume the cluster is installed with Agent Based Installer (https://docs.openshift.com/container-platform/4.16/installing/installing_with_agent_based_installer/preparing-to-install-with-agent-based-installer.html) with BareMetal platform type. Clusters with user-provisioned infrastructure require additional validation and configuration to use the Machine API.
Clusters with the infrastructure platform type none cannot use the Machine API. This limitation applies even if the compute machines that are attached to the cluster are installed on a platform that supports the feature. To view the platform type for your cluster, run the following command:
# oc get infrastructure cluster -o jsonpath='{.status.platform}'
BareMetal
I also assume the environment is connected to Internet, however performing this exercise in disconnected/air-gapped environment should be similar.
The last but not least I need to get coreos-installer package installed:
# dnf install -y coreos-installerScaling-out the compute nodes using manually crafted RHCOS ISO image.
This scenario covers the case where fully automated node provisioning cannot be performed. The Red Hat CoreOS ISO bootstrap image can be written on DVD, USB or simply mounted with VirtualMedia if your OOBM interface allows to boot the server from it. In my lab I use Sushy tools to emulate Redfish interface for baremetal management.
The initial state of the cluster looks as follow:
# oc get nodes,machines,machinesets,bmh
NAME STATUS ROLES AGE VERSION
node/master-0 Ready control-plane,master,worker 3d v1.30.4
node/master-1 Ready control-plane,master,worker 3d v1.30.4
node/master-2 Ready control-plane,master,worker 3d v1.30.4
NAME PHASE TYPE REGION ZONE AGE
machine.machine.openshift.io/ocp4-l2k5k-master-0 Running 3d
machine.machine.openshift.io/ocp4-l2k5k-master-1 Running 3d
machine.machine.openshift.io/ocp4-l2k5k-master-2 Running 3d
NAME DESIRED CURRENT READY AVAILABLE AGE
machineset.machine.openshift.io/ocp4-l2k5k-worker-0 0 0 3d
NAME STATE CONSUMER ONLINE ERROR AGE
baremetalhost.metal3.io/master-0 unmanaged ocp4-l2k5k-master-0 true 3d
baremetalhost.metal3.io/master-1 unmanaged ocp4-l2k5k-master-1 true 3d
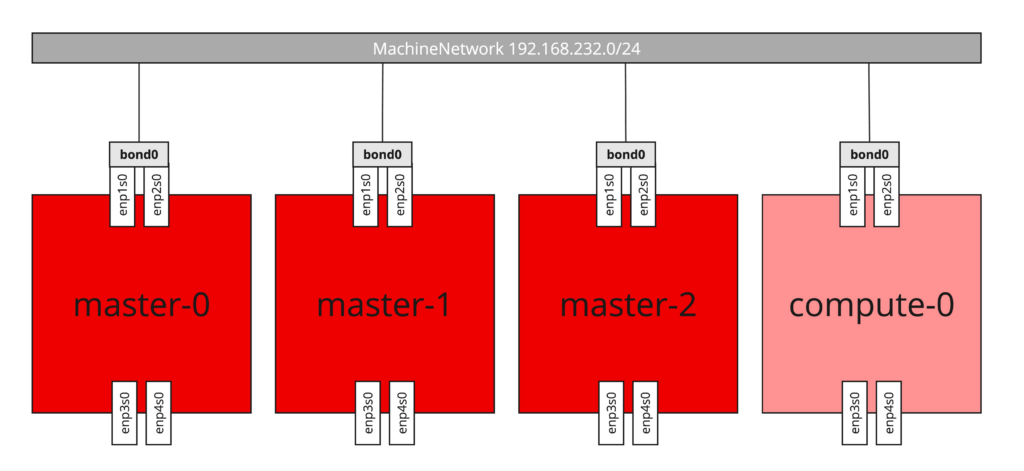
baremetalhost.metal3.io/master-2 unmanaged ocp4-l2k5k-master-2 true 3dAs you can see it is three nodes compact cluster where control plane and workloads are hosted on the same nodes. This deployment type allows you to benefit from highly available platform with minimal hardware footprint.
Setting network configuration for the new node
If your node has a single NIC and the IP configuration is obtained via DHCP that’s easy and you can skip to the next paragraph. However for the most of scenarios that’s not the case. Very often there are multiple NICs which are supposed to be configured as bonds, use of the tagged VLANs or there is no DHCP in place and IP configuration has to be statically applied. When you were installing your cluster using Agent Based Installer, you probably came across agent-config.yaml file which contains configuration of all nodes you’re deploying at the cluster installation time, including network configuration written in a NMState format. However now, since deployment is already done, the file isn’t useful anymore and you have to provide network configuration individually for the each node the other way. Luckily BareMetalHost resource allows to reference Secret with NMState configuration for the new node.
The full list of options including examples you can find at the official NMState project page: https://nmstate.io/. For the demo purposes I will configure bond interface with two physical NICs, using active-backup (Mode 1) bonding which does not require any integration at the switch side. Additionaly IP configuration is static, therefore each new node will require individual Secret with NMState configuration (WARNING: overlapping IP addresses ahead!). For more information about bonding and OpenShift, please refer to: https://docs.openshift.com/container-platform/4.16/networking/k8s_nmstate/k8s-nmstate-updating-node-network-config.html#virt-example-bond-nncp_k8s_nmstate-updating-node-network-config
Bellow is the content of Secret containing NMState configuration for my new baremetal node:
apiVersion: v1
kind: Secret
metadata:
  name: compute-0-network-config-secret
  namespace: openshift-machine-api
type: Opaque
stringData:
  nmstate: |
    interfaces:
      - name: bond0
        type: bond
        state: up
        link-aggregation:
          mode: active-backup
          options:
            primary: enp1s0
          port:
            - enp1s0
            - enp2s0
        ipv4:
          dhcp: false
          enabled: true
          address:
            - ip: 192.168.232.103
              prefix-length: 24
      - name: enp1s0
        type: ethernet
        state: up
        ipv4:
          enabled: false
          dhcp: false
      - name: enp2s0
        type: ethernet
        state: up
        ipv4:
          enabled: false
          dhcp: false
      - name: enp3s0
        type: ethernet
        state: up
        ipv4:
          enabled: false
          dhcp: false
      - name: enp4s0
        type: ethernet
        state: up
        ipv4:
          enabled: false
          dhcp: false
    routes:
      config:
        - destination: 0.0.0.0/0
          next-hop-address: 192.168.232.1
          next-hop-interface: bond0
          table-id: 254
    dns-resolver:
      config:
        server:
          - 192.168.232.1
The command to create it is as follow:
# oc -n openshift-machine-api create -f compute-0.nmstate.secret.yaml
secret/compute-0-network-config-secret created
Creating BareMetalHost resource (and labeling it)
The BareMetalHost resource defines a physical host and its properties. For more information about it please refer to Bare-metal configuration documentation. The resource definition looks as follow:
apiVersion: metal3.io/v1alpha1
kind: BareMetalHost
metadata:
  name: compute-0
  namespace: openshift-machine-api
spec:
  automatedCleaningMode: metadata
  bmc:
    address: ""
    credentialsName: ""
  bootMACAddress: de:ad:be:ef:66:04
  bootMode: UEFI
  customDeploy:
    method: install_coreos
  externallyProvisioned: true
  hardwareProfile: unknown
  online: true
  userData:
    name: worker-user-data-managed
    namespace: openshift-machine-api
The comprehensive description of BareMetalHost resource can be found at The BareMetalHost spec, but for now please check the following:
spec.bootMACAddress– this configures the MAC address that system is supposed to boot from. Since we’re not booting over network, this mac address is being used to confirm we’re working on the right server. If the NIC with the matching mac address won’t be found, the node will not be bootstrapped.
Please note there is no spec.bmc.address nor spec.bmc.credentialsName configured as the node won’t be managed by OpenShift’s Metal3 component. Furthermore I don’t specify here spec.networkData, spec.preprovisioningNetworkDataName and spec.rootDeviceHints as well. These parameters will be configured later at the time of RHCOS ISO image creation.
Now I will create the BareMetalHost resource for compute-0. Because it isn’t managed by the cluster it will remain in unmanaged state, there will be no automated introspection nor provisioning. Let’s also check labels of the all BareMetalHost I have configured so far:
# oc create -f compute-0.bmh.no-virtmedia.yaml
baremetalhost.metal3.io/compute-0 created

# oc get bmh --show-labels
NAME        STATE       CONSUMER              ONLINE   ERROR   AGE   LABELS
compute-0   unmanaged                         true             44s
master-0    unmanaged   ocp4-l2k5k-master-0   true             3d    installer.openshift.io/role=control-plane
master-1    unmanaged   ocp4-l2k5k-master-1   true             3d    installer.openshift.io/role=control-plane
master-2    unmanaged   ocp4-l2k5k-master-2   true             3d    installer.openshift.io/role=control-plane
The BareMetalHost I’ve added has no label while the other control-plane nodes have installer.openshift.io/role=control-plane configured. This label is important later to associate the right BareMetalHost with the related Machine and Node resources, so let me label compute-0 with worker role:
# oc label bmh compute-0 installer.openshift.io/role=worker
baremetalhost.metal3.io/compute-0 labeled

# oc get bmh --show-labels
NAME        STATE       CONSUMER              ONLINE   ERROR   AGE   LABELS
compute-0   unmanaged                         true             54s   installer.openshift.io/role=worker
master-0    unmanaged   ocp4-l2k5k-master-0   true             3d    installer.openshift.io/role=control-plane
master-1    unmanaged   ocp4-l2k5k-master-1   true             3d    installer.openshift.io/role=control-plane
master-2    unmanaged   ocp4-l2k5k-master-2   true             3d    installer.openshift.io/role=control-plane
Obtaining RHCOS ISO image
To bootstrap the host manually I need to get Red Hat CoreOS image first. Since each OpenShift version may use different image, the best way to obtain the exact needed image version is query OpenShift for it:
# oc -n openshift-machine-config-operator get configmap/coreos-bootimages -o jsonpath='{.data.stream}' | jq -r '.architectures.x86_64.artifacts.metal.formats.iso.disk.location'
https://rhcos.mirror.openshift.com/art/storage/prod/streams/4.17-9.4/builds/417.94.202408270355-0/x86_64/rhcos-417.94.202408270355-0-live.x86_64.iso

# curl -LO https://rhcos.mirror.openshift.com/art/storage/prod/streams/4.17-9.4/builds/417.94.202408270355-0/x86_64/rhcos-417.94.202408270355-0-live.x86_64.iso
  % Total    % Received % Xferd  Average Speed   Time    Time     Time  Current
                                 Dload  Upload   Total   Spent    Left  Speed
100 1173M  100 1173M    0     0  97.7M      0  0:00:11  0:00:11 --:--:-- 75.9M

# file rhcos-417.94.202408270355-0-live.x86_64.iso
rhcos-417.94.202408270355-0-live.x86_64.iso: ISO 9660 CD-ROM filesystem data (DOS/MBR boot sector) 'rhcos-417.94.202408270355-0' (bootable)
I could now boot this ISO straightaway but then it would take me to the shell and I had to run all necessary installation commands manually through the console. For this exercise I look for automated installation process. Luckily all the necessary information is already existing in the cluster.
Getting Ignition file for a compute node
Let’s start first with the Ignition file for worker (compute) nodes. I can get generic one from worker-user-data-managed Secret resource stored in openshift-machine-api project:
# oc -n openshift-machine-api extract secret/worker-user-data-managed --keys userData --to=- > worker.userData.ignCreating NMState file
If my new node would have just a single NIC connected to network with DHCP server I’d skip this step and move to the next paragraph. However since I have multiple NICs, have no DHCP server in the network and on the top of everything I’d like to get configured bonded logical interface, I have to provide network configuration in advance, so when the system boots from the ISO it will get it properly configured. Fortunately coreos-installer can include network configuration in NMState format so let’s prepare the file right now. In my case the content of file is as follows:
interfaces:
  - name: bond0
    type: bond
    state: up
    link-aggregation:
      mode: active-backup
      options:
        primary: enp1s0
      port:
        - enp1s0
        - enp2s0
    ipv4:
      dhcp: false
      enabled: true
      address:
        - ip: 192.168.232.103
          prefix-length: 24
  - name: enp1s0
    type: ethernet
    state: up
    ipv4:
      enabled: false
      dhcp: false
  - name: enp2s0
    type: ethernet
    state: up
    ipv4:
      enabled: false
      dhcp: false
  - name: enp3s0
    type: ethernet
    state: up
    ipv4:
      enabled: false
      dhcp: false
  - name: enp4s0
    type: ethernet
    state: up
    ipv4:
      enabled: false
      dhcp: false
routes:
  config:
    - destination: 0.0.0.0/0
      next-hop-address: 192.168.232.1
      next-hop-interface: bond0
      table-id: 254
dns-resolver:
  config:
    server:
      - 192.168.232.1
The full list of options including examples is available at the official NMState project page: https://nmstate.io/.
Customising RHCOS ISO image for an individual node
Each node requires unique hostname and IP address assigned. Since I don’t run DHCP in my lab I have to somehow pass this information to the bootstrap process in the ISO image.
Hostname configuration cannot be passed via NMState and therefore I need to slightly modify the Ignition file. The command below will create new, personalised Ignition file which will create /etc/hostname file upon system bootstrap containing the expected hostname value:
# export NEW_HOSTNAME=compute-0

# cat worker.userData.ign  | jq '. += {"storage": {"files": [{"path": "/etc/hostname", "contents": {"source": "data:,'${NEW_HOSTNAME}'"}, "mode": 420}]}}' > ${NEW_HOSTNAME}.userData.ign
And just do double-check:
# cat compute-0.userData.ign |  jq  .storage
{
  "files": [
    {
      "path": "/etc/hostname",
      "contents": {
        "source": "data:,compute-0"
      },
      "mode": 420
    }
  ]
}
So now I should have the following files prepared:
compute-0.bmh.yaml– BareMetalHost definition for the new node, this resource has been already created in the previous step.compute-0.userData.ign– customized userData file for the new node, it includes /etc/hostname file content and should be used exclusively with compute-0 nodecompute-0.nmstate.yaml– NMState config file for compute-0 node, includes static IP configuration and bonded interfacesrhcos-417.94.202408270355-0-live.x86_64.iso– vanilla RHCOS ISO imageworker.userData.ign– generic userData for worker nodes which I used to create compute-0.userData.ign from it
The command bellow will create the ISO file to bootstrap the server and use /dev/sda device as root device. Please note the warning message – it will overwrite /dev/sda disk without any warning nor confirmation once booted!
# export NEW_HOSTNAME=compute-0
# coreos-installer iso customize --network-nmstate compute-0.nmstate.yaml --dest-device /dev/sda --dest-ignition ${NEW_HOSTNAME}.userData.ign rhcos-417.94.202408270355-0-live.x86_64.iso -o ${NEW_HOSTNAME}.rhcos.iso
Boot media will automatically install to /dev/sda without confirmation.
The output file compute-0.rhcos.iso is ready to be used to bootstrap compute-0 node (and only this node as it has hardcoded IP and hostname configurations).
# file compute-0.rhcos.iso
compute-0.rhcos.iso: ISO 9660 CD-ROM filesystem data (DOS/MBR boot sector) 'rhcos-417.94.202408270355-0' (bootable)
Bootstrapping the new server with the customised ISO image
Depends on the hardware configuration I could burn this ISO on DVD, create bootable USB stick or use Virtual Media feature of my out-of-band management interface. Since in my lab I have Sushy tools emulating Redfish interface, I will use it to boot the ISO remotely from http server.
Once I copied the ISO to the system where I run accessible from the OOBM network http server, I just want to verify all the permissions are set right to avoid unnecessary troubleshooting later:
# curl -I http://192.168.232.128/compute-0.rhcos.iso
HTTP/1.1 200 OK
Server: nginx/1.20.1
Content-Type: application/octet-stream
Content-Length: 1229979648
Connection: keep-alive
Accept-Ranges: bytes
Now please note that the commands I run here and outputs depends on the OOBM interface implementation. This is how it looks like for Redfish provided by Sushy tools on virtualised systems pretending to be bare metals. In case of any other management interfaces, including these supporting Redfish it will most likely look differently.
The first POST request with a JSON payload made with curl is to mount the ISO from http server:
# curl -k -d '{"Image":"http://192.168.232.128/compute-0.rhcos.iso", "Inserted": true}' -H "Content-Type: application/json" -X POST https://192.168.232.1:8000/redfish/v1/Managers/80db3a4f-930c-4f5f-b4d0-cf18356fe9a5/VirtualMedia/Cd/Actions/VirtualMedia.InsertMediaTo verify it is successfully mounted I run another curl GET request:
# curl -k https://192.168.232.1:8000/redfish/v1/Managers/80db3a4f-930c-4f5f-b4d0-cf18356fe9a5/VirtualMedia/Cd/ | jq .
{
  "@odata.type": "#VirtualMedia.v1_1_0.VirtualMedia",
  "Id": "Cd",
  "Name": "Virtual CD",
  "MediaTypes": [
    "CD",
    "DVD"
  ],
  "Image": "compute-0.rhcos.iso",
  "ImageName": "",
  "ConnectedVia": "URI",
  "Inserted": true,
  "WriteProtected": false,
  "Actions": {
    "#VirtualMedia.EjectMedia": {
      "target": "/redfish/v1/Managers/80db3a4f-930c-4f5f-b4d0-cf18356fe9a5/VirtualMedia/Cd/Actions/VirtualMedia.EjectMedia"
    },
    "#VirtualMedia.InsertMedia": {
      "target": "/redfish/v1/Managers/80db3a4f-930c-4f5f-b4d0-cf18356fe9a5/VirtualMedia/Cd/Actions/VirtualMedia.InsertMedia"
    },
    "Oem": {}
  },
  "@odata.context": "/redfish/v1/$metadata#VirtualMedia.VirtualMedia",
  "@odata.id": "/redfish/v1/Managers/80db3a4f-930c-4f5f-b4d0-cf18356fe9a5/VirtualMedia/Cd",
  "@Redfish.Copyright": "Copyright 2014-2017 Distributed Management Task Force, Inc. (DMTF). For the full DMTF copyright policy, see http://www.dmtf.org/about/policies/copyright."
Important: Before I turn on the server I need to ensure it has configured correct boot order. Ideally it should first attempt to boot from (empty) HDD then try with DVD. This may not work if I have previously installed system still on the disk. Then I’d need to enforce system to temporarily boot from the DVD and later, once bootstrap will be completed and system reboot on itself, it will start from HDD. Failing to configure it properly may result in either DVD boot loop (and each result will bootstrap the node) or booting previously installed system. This may be quite funny to troubleshoot if the previously installed system was RHCOS for another OpenShift deployment. System will boot like regular, properly provisioned node but it won’t register with the cluster. I’m telling you – troubleshooting it is quite funny experience 😉
Since I ensured the right boot order is set and disk drive on the new node is empty I can turn on the system and let it bootstrap itself:
# curl -k -X POST -H "Content-Type: application/json" -d '{"ResetType":"On"}' https://192.168.232.1:8000/redfish/v1/Systems/80db3a4f-930c-4f5f-b4d0-cf18356fe9a/Actions/ComputerSystem.ResetTo ensure it really boots from the ISO I opened the console. “RHEL CoreOS (Live)” GRUB menu item below confirms it starts from the Live ISO and not from the local disk drive:
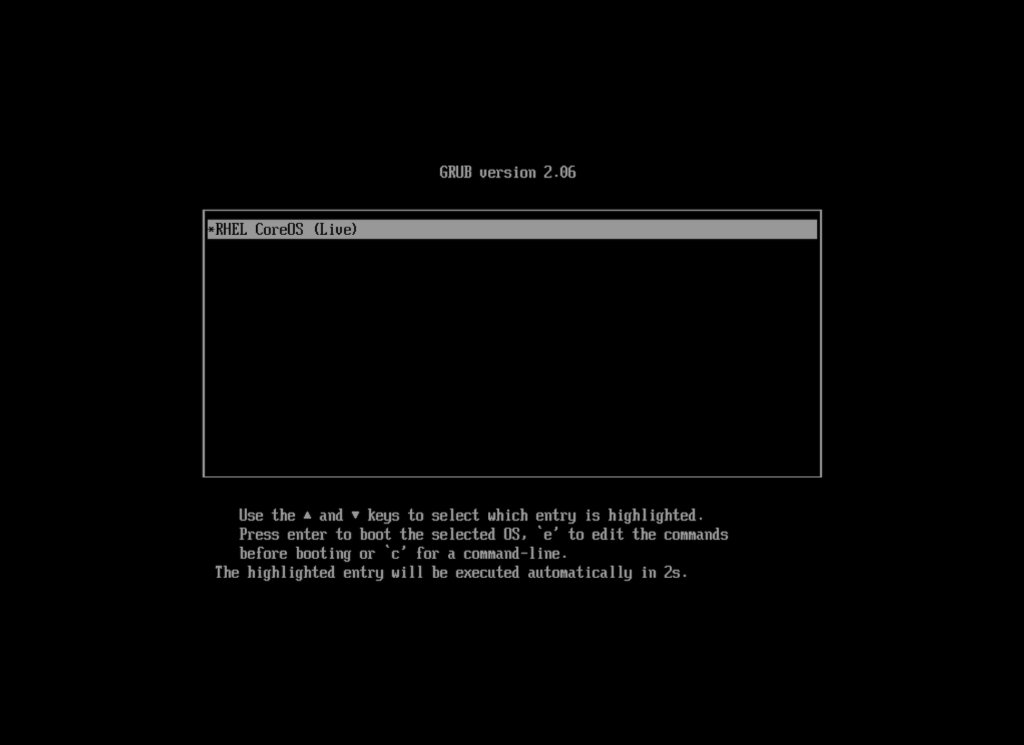
Once booted it will start with the installation. I can observe its progress on the console as well:
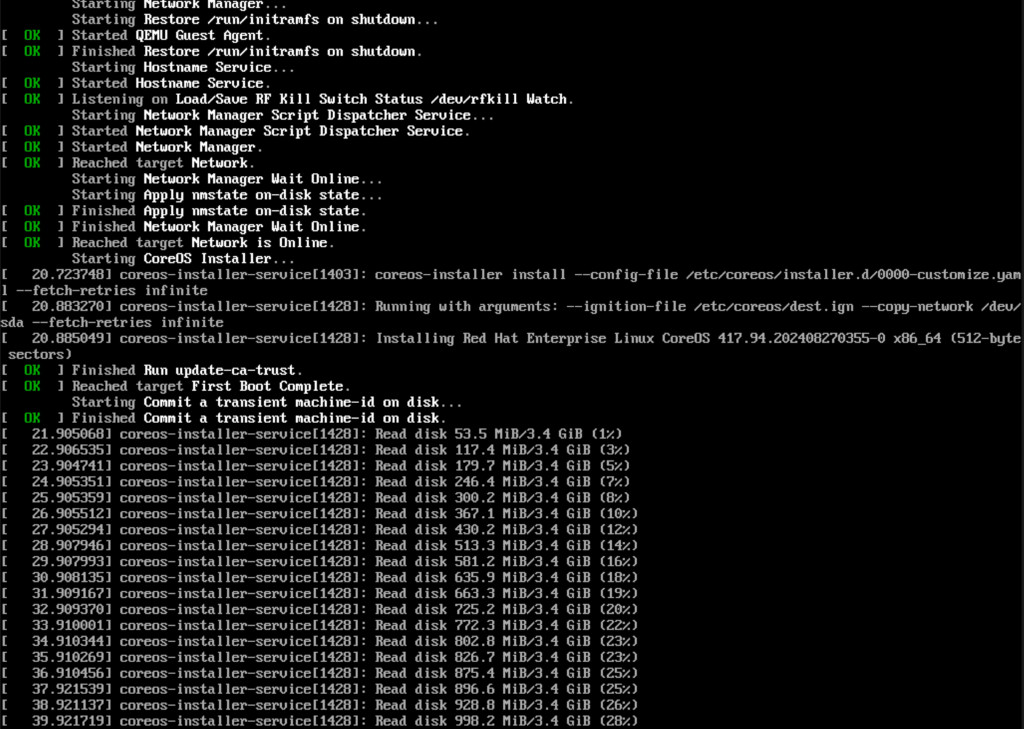
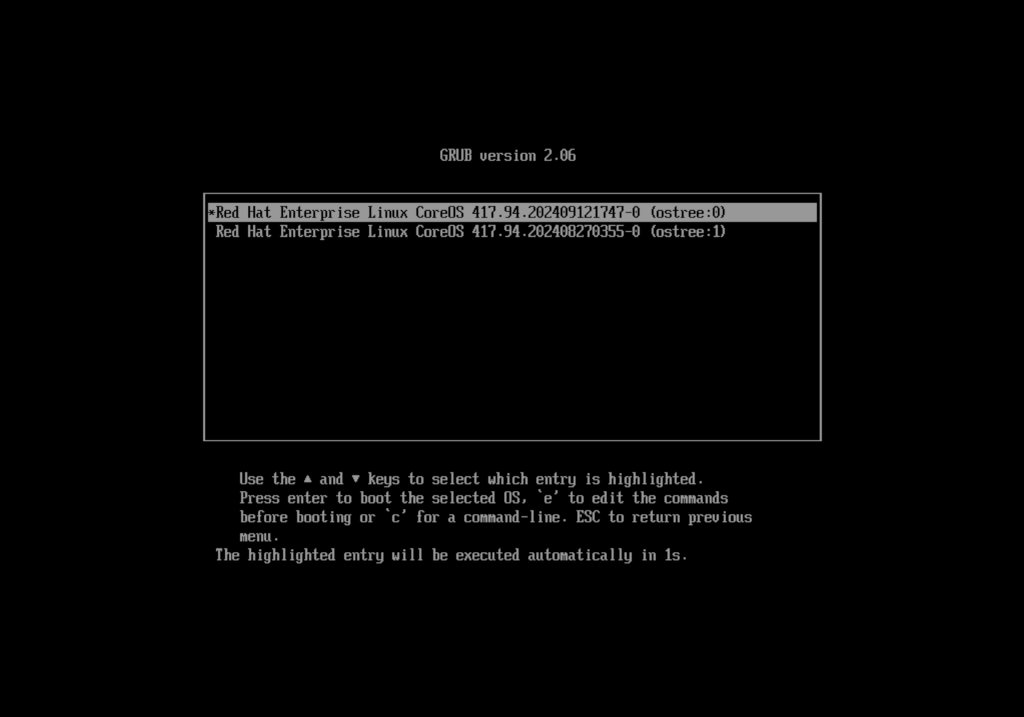
During the bootstrap process system may reboot twice. First time to boot from the local drive using RHCOS installed from the live ISO – it will install the lates version of RHCOS, second boot is the final one – from the local drive but with the recent RHCOS version as I can see below (please note the 2nd entry in the GRUB menu is the previous version of RHCOS installed from the Live ISO, the 1st entry is the newest one that will start shortly):
Before the new node will join the cluster, I need to approve three “Certificate Signing Requests” as bellow. They will occur one after another so it is convenient to run oc get csr -w command in one terminal and approve them in the other when occurred.
# oc get csr -w
NAME        AGE   SIGNERNAME                                    REQUESTOR                                                                   REQUESTEDDURATION   CONDITION
csr-n7n5q   0s    kubernetes.io/kube-apiserver-client-kubelet   system:serviceaccount:openshift-machine-config-operator:node-bootstrapper   <none>              Pending
csr-r6jtp   0s    kubernetes.io/kube-apiserver-client-kubelet   system:serviceaccount:openshift-machine-config-operator:node-bootstrapper   <none>              Pending
csr-n7n5q   17s   kubernetes.io/kube-apiserver-client-kubelet   system:serviceaccount:openshift-machine-config-operator:node-bootstrapper   <none>              Approved
csr-n7n5q   17s   kubernetes.io/kube-apiserver-client-kubelet   system:serviceaccount:openshift-machine-config-operator:node-bootstrapper   <none>              Approved,Issued
csr-r6jtp   16s   kubernetes.io/kube-apiserver-client-kubelet   system:serviceaccount:openshift-machine-config-operator:node-bootstrapper   <none>              Approved
csr-r6jtp   16s   kubernetes.io/kube-apiserver-client-kubelet   system:serviceaccount:openshift-machine-config-operator:node-bootstrapper   <none>              Approved,Issued
csr-wwpp2   0s    kubernetes.io/kubelet-serving                 system:node:compute-0                                                       <none>              Pending
csr-wwpp2   13s   kubernetes.io/kubelet-serving                 system:node:compute-0                                                       <none>              Approved
csr-wwpp2   13s   kubernetes.io/kubelet-serving                 system:node:compute-0                                                       <none>              Approved,Issued
# oc adm certificate approve csr-n7n5q
certificatesigningrequest.certificates.k8s.io/csr-n7n5q approved
# oc adm certificate approve csr-r6jtp
certificatesigningrequest.certificates.k8s.io/csr-r6jtp approved
# oc adm certificate approve csr-wwpp2
certificatesigningrequest.certificates.k8s.io/csr-wwpp2 approvedOnce all required CSR have been approved the new node will appear on the nodes list and hopefully turn into “Ready” state
# oc get nodes -w
NAME       STATUS   ROLES                         AGE   VERSION
master-0   Ready    control-plane,master,worker   3d   v1.30.4
master-1   Ready    control-plane,master,worker   3d   v1.30.4
master-2   Ready    control-plane,master,worker   3d   v1.30.4
compute-0   NotReady   worker                        0s    v1.30.4
compute-0   NotReady   worker                        53s   v1.30.4
compute-0   Ready      worker                        64s   v1.30.4
# oc get nodes,machines,machinesets,bmh,mcp
NAME STATUS ROLES AGE VERSION
node/compute-0 Ready worker 10m v1.30.4
node/master-0 Ready control-plane,master,worker 3d v1.30.4
node/master-1 Ready control-plane,master,worker 3d v1.30.4
node/master-2 Ready control-plane,master,worker 3d v1.30.4
NAME PHASE TYPE REGION ZONE AGE
machine.machine.openshift.io/ocp4-l2k5k-master-0 Running 3d
machine.machine.openshift.io/ocp4-l2k5k-master-1 Running 3d
machine.machine.openshift.io/ocp4-l2k5k-master-2 Running 3d
NAME DESIRED CURRENT READY AVAILABLE AGE
machineset.machine.openshift.io/ocp4-l2k5k-worker-0 0 0 3d
NAME STATE CONSUMER ONLINE ERROR AGE
baremetalhost.metal3.io/compute-0 unmanaged true 20m
baremetalhost.metal3.io/master-0 unmanaged ocp4-l2k5k-master-0 true 3d
baremetalhost.metal3.io/master-1 unmanaged ocp4-l2k5k-master-1 true 3d
baremetalhost.metal3.io/master-2 unmanaged ocp4-l2k5k-master-2 true 3d
NAME CONFIG UPDATED UPDATING DEGRADED MACHINECOUNT READYMACHINECOUNT UPDATEDMACHINECOUNT DEGRADEDMACHINECOUNT AGE
master rendered-master-3980d9fd20abd3edb06d23c72c4ee7e1 True False False 3 3 3 0 3d
worker rendered-worker-f2e82a9776085629a65e45a6a2751456 True False False 1 1 1 0 3dThe node is now fully functional and recognised by the cluster, including MachineConfig operator. New workloads can be scheduled on it already.
Missing bits
While the node is up and running and I could stop now, there are two bits missing on the outputs above:
BareMetalHostcompute-0 has no consumer defined- There is no
Machineresource for compute-0 node
They would be normally configured by the automation as happened in Scaling OpenShift compute (worker) BareMetal nodes – Part 1 exercise, but since in this case I’m responsible for “automating’ things I have to create them manually.
Firstly I need to get UID of the BareMetalHost compute-0:
# oc -n openshift-machine-api get bmh compute-0 -o json | jq -r .metadata.uid
e8933748-c06e-4e35-9bab-02b7a3f3619a
Now with that information I will reference Node compute-0 to BareMetalHost compute-0:
Please note how providerID path is being build: it is in baremetalhost:///openshift-machine-api/${BMH_NAME}/${BMH_UID} format
# oc patch node compute-0 -p '{"spec": {"providerID": "baremetalhost:///openshift-machine-api/compute-0/e8933748-c06e-4e35-9bab-02b7a3f3619a"}}'
node/compute-0 patched
The last missing resource is a Machine. I will create it from the following template:
apiVersion: machine.openshift.io/v1beta1
kind: Machine
metadata:
  name: compute-0
  annotations:
    machine.openshift.io/instance-state: unmanaged
    metal3.io/BareMetalHost: openshift-machine-api/compute-0
  labels:
    machine.openshift.io/cluster-api-machine-role: worker
    machine.openshift.io/cluster-api-machine-type: worker
spec:
  metadata: {}
  providerSpec:
    value:
      apiVersion: baremetal.cluster.k8s.io/v1alpha1
      customDeploy:
        method: install_coreos
      hostSelector: {}
      image:
        checksum: ''
        url: ''
      kind: BareMetalMachineProviderSpec
      metadata:
        creationTimestamp: null
      userData:
        name: worker-user-data-managed
# oc create -f compute-0.machine.yaml
machine.machine.openshift.io/compute-0 createdNow if I review the status of all the resources I’ve been tinkering with, it looks much more elegant:
Please note MachineSet does not include this newly added compute-0 node as it does not manage it.
# oc get nodes,machines,machinesets,bmh,mcp
NAME             STATUS   ROLES                         AGE   VERSION
node/compute-0   Ready    worker                        21m   v1.30.4
node/master-0    Ready    control-plane,master,worker   3d    v1.30.4
node/master-1    Ready    control-plane,master,worker   3d    v1.30.4
node/master-2    Ready    control-plane,master,worker   3d    v1.30.4

NAME                                               PHASE     TYPE   REGION   ZONE   AGE
machine.machine.openshift.io/compute-0             Running                          4m3s
machine.machine.openshift.io/ocp4-l2k5k-master-0   Running                          3d
machine.machine.openshift.io/ocp4-l2k5k-master-1   Running                          3d
machine.machine.openshift.io/ocp4-l2k5k-master-2   Running                          3d

NAME                                                  DESIRED   CURRENT   READY   AVAILABLE   AGE
machineset.machine.openshift.io/ocp4-l2k5k-worker-0   0         0                             3d

NAME                                STATE       CONSUMER              ONLINE   ERROR   AGE
baremetalhost.metal3.io/compute-0   unmanaged   compute-0             true             42m
baremetalhost.metal3.io/master-0    unmanaged   ocp4-l2k5k-master-0   true             3d
baremetalhost.metal3.io/master-1    unmanaged   ocp4-l2k5k-master-1   true             3d
baremetalhost.metal3.io/master-2    unmanaged   ocp4-l2k5k-master-2   true             3d

NAME                                                         CONFIG                                             UPDATED   UPDATING   DEGRADED   MACHINECOUNT   READYMACHINECOUNT   UPDATEDMACHINECOUNT   DEGRADEDMACHINECOUNT   AGE
machineconfigpool.machineconfiguration.openshift.io/master   rendered-master-3980d9fd20abd3edb06d23c72c4ee7e1   True      False      False      3              3                   3                     0                      3d
machineconfigpool.machineconfiguration.openshift.io/worker   rendered-worker-f2e82a9776085629a65e45a6a2751456   True      False      False      1              1                   1                     0                      3d
Summary
In this exercise I’ve demonstrated how to manually add new compute node to the existing OpenShift cluster. While it isn’t very straightforward process compared to the fully automated one presented in part 1, all the necessary bits are available in the platform. The only challenge is to know what and where they are.
One response to “Scaling OpenShift compute (worker) BareMetal nodes – Part 2”
Thanks a lot Rafa for putting it together, this is a missing bit in OpenShift documentation.