OpenShift can be installed on various platforms (cloud, virtual, baremetal etc) using various tools (IPI, UPI, Assisted Installer or Agent-based Installer). For the last months I use the later the most and in this post I will focus on a cluster being installed with the Agent-based Installer.
The whole installation procedure is out of the scope for this post, but you can dig deeper into it starting with this document: https://docs.openshift.com/container-platform/4.16/installing/installing_with_agent_based_installer/preparing-to-install-with-agent-based-installer.html.
The Agent-based Installer allows you to flexibly configure nodes networking accordingly to your environment or needs. This can include bonded, tagged networks running on the top of SR-IOV devices if required. Network configuration at the installation time is extensively explained – with examples – in the OpenShift documentation: https://docs.openshift.com/container-platform/4.16/installing/installing_with_agent_based_installer/preparing-to-install-with-agent-based-installer.html#agent-install-sample-config-bonds-vlans_preparing-to-install-with-agent-based-installer
However what is not documented is how to update the configuration after the deployment.
Please note: This may be subject to SLA constraints so please consider this post as an example only and do not apply anything to your production environments without checking it first with your friends from the Red Hat support.
Single NIC configuration
Let’s assume you deployed the cluster with just a very simple network configuration, everything is configured on a single physical NIC. In this example it is enp1s0 with 192.168.232.101/24 as on the diagram below.
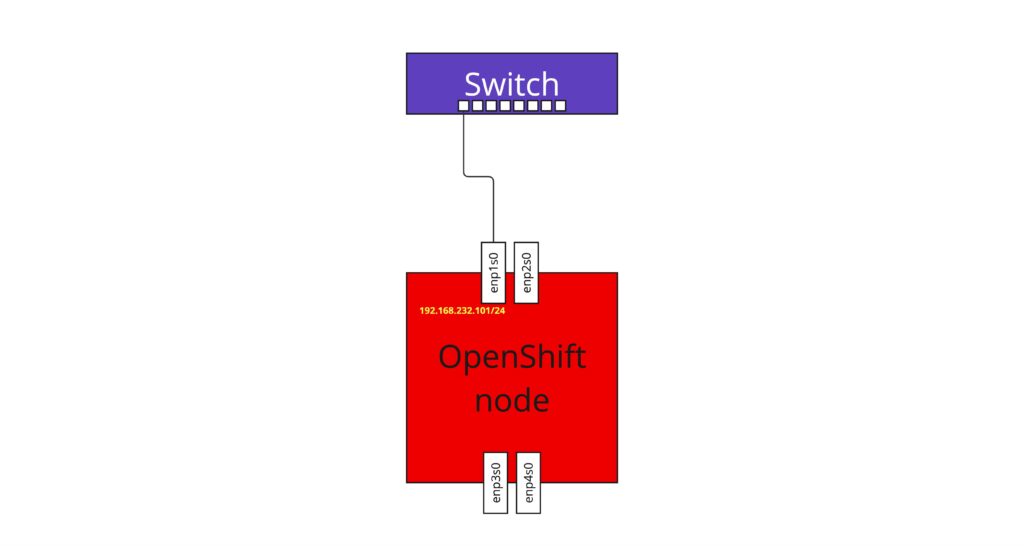
To make it slightly more complicated, IP configuration is static – you don’t use DHCP to assign it dynamically to the nodes.
The agent-config.yaml file used to deploy nodes with such configuration could look like below:
apiVersion: v1alpha1
kind: AgentConfig
rendezvousIP: 192.168.232.100
hosts:
(...)
  - hostname: master-1
    rootDeviceHints:
      deviceName: "/dev/sda"
    interfaces:
      - name: enp1s0
        macAddress: de:ad:be:ef:66:01
    networkConfig:
      routes:
        config:
          - destination: 0.0.0.0/0
            next-hop-address: 192.168.232.1
            next-hop-interface: enp1s0
            table-id: 254
      dns-resolver:
        config:
          server:
            - 192.168.232.1
      interfaces:
        - name: enp1s0
          type: ethernet
          state: up
          ipv4:
            dhcp: false
            enabled: true
            address:
              - ip: 192.168.232.101
                prefix-length: 24
        - name: enp2s0
          type: ethernet
          state: down
          ipv4:
            dhcp: false
            enabled: false
        - name: enp3s0
          type: ethernet
          state: down
          ipv4:
            dhcp: false
            enabled: false
        - name: enp4s0
          type: ethernet
          state: down
          ipv4:
            dhcp: false
            enabled: false
(...)
On the OpenShift node, the data above would translate into following interface configuration:
# ip address show
(...)
2: enp1s0: <BROADCAST,MULTICAST,UP,LOWER_UP> mtu 1500 qdisc fq_codel master ovs-system state UP group default qlen 1000
    link/ether de:ad:be:ef:66:01 brd ff:ff:ff:ff:ff:ff
(...)
8: br-ex: <BROADCAST,MULTICAST,UP,LOWER_UP> mtu 1500 qdisc noqueue state UNKNOWN group default qlen 1000
    link/ether de:ad:be:ef:66:01 brd ff:ff:ff:ff:ff:ff
    inet 192.168.232.101/24 brd 192.168.232.255 scope global noprefixroute br-ex
       valid_lft forever preferred_lft forever
    inet 169.254.169.2/29 brd 169.254.169.7 scope global br-ex
       valid_lft forever preferred_lft forever
    inet 192.168.232.111/32 scope global vip
       valid_lft forever preferred_lft forever
    inet 192.168.232.110/32 scope global vip
       valid_lft forever preferred_lft forever
(...)
# ovs-vsctl list-ports br-ex
enp1s0
patch-br-ex_master-1-to-br-int
As you can see, OpenShift configured OVS bridge br-ex on the top of default route NIC which was there at the time of Kubernetes start (system boot). The IP configuration was inherited from it (192.168.232.101/24 address) and additional IPs from the same range (machineNetwork – 192.168.232.0/24) were configured as well (API and Ingress virtual IPs).
While the configuration itself is correct it has one big disadvantage – in case of NIC/cable/switch port failure – node will immediately become unreachable. If the platform is supposed to host any important workloads, redundancy is what you’re looking for.
So how to turn it into something more production grade? Get a bond configured to provide NIC level redundancy.
Network bond types in Linux
There is few type of bond configurations available in Linux. For detailed description please refer to https://docs.redhat.com/en/documentation/red_hat_enterprise_linux/9/html/configuring_and_managing_networking/configuring-network-bonding_configuring-and-managing-networking. From my perspective the two most commonly used are active-backup and 802.3ad (LACP). The first one is simple active-backup and does not require any fancy switch or configuration on it, the second is more complicated, requires switch supporting LACP and proper configuration in place, but offers much more benefits over the simple one. Due to the restrictions in my lab I will focus on the easy one 😉
Alternative options to apply configuration update
Since the node was already deployed, update of agent-config.yaml file won’t help here.
Using NMState Operator (https://docs.openshift.com/container-platform/4.16/networking/k8s_nmstate/k8s-nmstate-about-the-k8s-nmstate-operator.html) isn’t good idea as it applies desired configuration AFTER Kubernetes is started and already bound to the IP address. In such case you will lose connectivity to the Kubernetes processes running on the node as they don’t like IP to travel between interfaces. You could restart them after NMState did it thing but this will happen each time you reboot the node – simple race condition.
Potentially MachineConfigOperator could help here (https://docs.openshift.com/container-platform/4.16/machine_configuration/index.html). The challenge here is with statically configured IP addresses. The MCO is helpful to apply the same setting across fleet of nodes, not to each of them individually. That would work if you have DHCP there as each of the nodes would have exactly the same configuration, while IP configuration is differentiated between the nodes at DHCP configuration level.
Using nmcli in offline mode to generate configuration files
Nevertheless the MachineConfigOperator approach would do exactly the same what I will propose next – configure NetworkManager connection keyfiles in /etc/NetworkManager/system-connections folder. Let’s take a look what’s there now:
# ls -la /etc/NetworkManager/system-connections/
total 16
drwxr-xr-x. 2 root root 114 Aug 30 12:27 .
drwxr-xr-x. 7 root root 134 Aug 30 12:26 ..
-rw-------. 1 root root 383 Aug 30 12:27 enp1s0.nmconnection
-rw-------. 1 root root 265 Aug 30 12:27 enp2s0.nmconnection
-rw-------. 1 root root 265 Aug 30 12:27 enp3s0.nmconnection
-rw-------. 1 root root 265 Aug 30 12:27 enp4s0.nmconnection

# cat /etc/NetworkManager/system-connections/enp1s0.nmconnection
[connection]
autoconnect=true
autoconnect-slaves=-1
id=enp1s0
interface-name=enp1s0
type=802-3-ethernet
uuid=11655ff4-09bf-500f-9f38-9bfcc91ab36b
autoconnect-priority=1

[ipv4]
address0=192.168.232.101/24
dhcp-timeout=2147483647
dns=192.168.232.1
dns-priority=40
method=manual
route0=0.0.0.0/0,192.168.232.1,0
route0_options=table=254

[ipv6]
dhcp-timeout=2147483647
method=disabled
As you can see above, Agent-based installer just created these static files with configuration that has been specified in the agent-config.yaml file. The good thing is the files are persistent across reboots and upgrades, so even it isn’t the most elegant approach (in case of CoreOS you should refrain from editing files manually) you can update them manually and nothing bad should happen 😉
While you could potentially create new files manually I believe it is safer to use nmctl tool to generate it – this will ensure syntax is correct and safe you some troubleshooting later on. To start please become familiar with https://docs.redhat.com/en/documentation/red_hat_enterprise_linux/9/html/configuring_and_managing_networking/assembly_networkmanager-connection-profiles-in-keyfile-format_configuring-and-managing-networking#proc_using-nmcli-to-create-keyfile-connection-profiles-in-offline-mode_assembly_networkmanager-connection-profiles-in-keyfile-format document as it explains how and why to use nmcli in offline mode (spoiler alert: offline mode creates keyfile connection profiles without touching running configuration).
Once you know how to use nmcli in offline mode and it happen you want to configure NIC bonding there, it will be good idea to become with your bond configuration options too: https://docs.redhat.com/en/documentation/red_hat_enterprise_linux/9/html/configuring_and_managing_networking/configuring-network-bonding_configuring-and-managing-networking#understanding-the-default-behavior-of-controller-and-port-interfaces_configuring-network-bonding
Let’s create bond interface first – remember, there will bo no change in the running configuration – the command below will create nmconnection keyfile only and it will be applied only when you reboot the node.
Please note the umask command – NetworkManager expect nmconnection files to be readable only for root user, otherwise it will ignore them.
# umask 0077 && nmcli --offline connection add type bond con-name bond0 ifname bond0 bond.options 'mode=active-backup' ipv4.gateway '192.168.232.1' ipv4.addresses '192.168.232.101/24' ipv4.dns '192.168.232.1' ipv4.method manual | tee /etc/NetworkManager/system-connections/bond0.nmconnection

[connection]
id=bond0
uuid=f86482ad-8145-4624-8018-b9257ef60686
type=bond
interface-name=bond0

[bond]
mode=active-backup

[ipv4]
address1=192.168.232.101/24,192.168.232.1
dns=192.168.232.1;
method=auto

[ipv6]
addr-gen-mode=default
method=auto

[proxy]
Now let’s ensure the bond will be assigned with two NICs – enp1s0 and enp2s0:
# umask 0077 && nmcli --offline connection add type ethernet port-type bond con-name bond0-port1 ifname enp1s0 controller bond0 | sed '/^Warning:.*/d' | tee /etc/NetworkManager/system-connections/enp1s0.nmconnection

[connection]
id=bond0-port1
uuid=f4885096-6a7f-4741-ae32-2b35513ebf21
type=ethernet
controller=bond0
interface-name=enp1s0
master=bond0
port-type=bond
slave-type=bond

[ethernet]

[bond-port]

# umask 0077 && nmcli --offline connection add type ethernet port-type bond con-name bond0-port2 ifname enp2s0 controller bond0 | sed '/^Warning:.*/d' | tee /etc/NetworkManager/system-connections/enp2s0.nmconnection

[connection]
id=bond0-port2
uuid=32345c95-9809-49e8-9a89-ddfbc87be8d0
type=ethernet
controller=bond0
interface-name=enp2s0
master=bond0
port-type=bond
slave-type=bond

[ethernet]

[bond-port]
New configuration verification
Now once you reboot the node, it should come back on-line with new network configuration:
# ip address show
(...)
2: enp1s0: <BROADCAST,MULTICAST,SLAVE,UP,LOWER_UP> mtu 1500 qdisc fq_codel master bond0 state UP group default qlen 1000
link/ether de:ad:be:ef:66:01 brd ff:ff:ff:ff:ff:ff
3: enp2s0: <BROADCAST,MULTICAST,SLAVE,UP,LOWER_UP> mtu 1500 qdisc fq_codel master bond0 state UP group default qlen 1000
link/ether de:ad:be:ef:66:01 brd ff:ff:ff:ff:ff:ff permaddr de:ad:be:ef:67:01
(...)
10: bond0: <BROADCAST,MULTICAST,MASTER,UP,LOWER_UP> mtu 1500 qdisc noqueue master ovs-system state UP group default qlen 1000
link/ether de:ad:be:ef:66:01 brd ff:ff:ff:ff:ff:ff
11: br-ex: <BROADCAST,MULTICAST,UP,LOWER_UP> mtu 1500 qdisc noqueue state UNKNOWN group default qlen 1000
link/ether de:ad:be:ef:66:01 brd ff:ff:ff:ff:ff:ff
inet 192.168.232.101/24 brd 192.168.232.255 scope global noprefixroute br-ex
valid_lft forever preferred_lft forever
inet 169.254.169.2/29 brd 169.254.169.7 scope global br-ex
valid_lft forever preferred_lft forever
inet 192.168.232.111/32 scope global vip
valid_lft forever preferred_lft forever
inet6 fe80::6913:da4:9d90:fb4/64 scope link noprefixroute
valid_lft forever preferred_lft forever
# cat /proc/net/bonding/bond0
Ethernet Channel Bonding Driver: v5.14.0-427.33.1.el9_4.x86_64
Bonding Mode: fault-tolerance (active-backup)
Primary Slave: None
Currently Active Slave: enp2s0
MII Status: up
MII Polling Interval (ms): 100
Up Delay (ms): 0
Down Delay (ms): 0
Peer Notification Delay (ms): 0
Slave Interface: enp2s0
MII Status: up
Speed: Unknown
Duplex: Unknown
Link Failure Count: 0
Permanent HW addr: de:ad:be:ef:67:01
Slave queue ID: 0
Slave Interface: enp1s0
MII Status: up
Speed: Unknown
Duplex: Unknown
Link Failure Count: 0
Permanent HW addr: de:ad:be:ef:66:01
Slave queue ID: 0
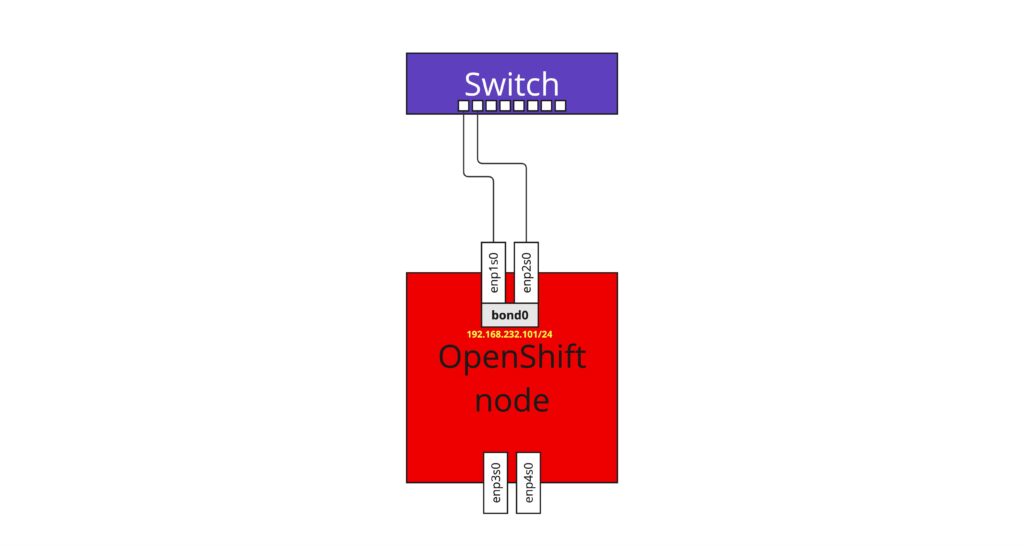
# ovs-vsctl list-ports br-ex
bond0
patch-br-ex_master-1-to-br-intAs you can see there is new bond interface which is connected to br-ex (this happens automatically when Kubernetes starts). The bond is configured on the top of enp1s0 and enp2s0 interfaces with active-backup mode. Therefore we can conclude this post now with the following network layout diagram.