This post is based on my experience deploying and scaling OpenShift clusters on baremetal environments. As usual the intention is not to replace official Red Hat’s documentation. It is rather condensed knowledge I gained with references to the official docs, just in case 😉 Please keep in mind that your millage may vary and if you’re Red Hat customer, it is always better to reach your support teams.
If you run your OpenShift cluster on a cloud platform it is pretty straightforward to add and remove computing (compute, worker) nodes. The integration with cloud platform does everything on your behalf, you just have to simply increase the number of expected compute nodes through MachineSet as explained in this document: https://docs.openshift.com/container-platform/4.16/machine_management/manually-scaling-machineset.html
However, it may be slightly more challenging if you run your cluster on physical (baremetal) servers as more variables and moving parts come to play. For an instance your nodes may have different NICs layouts, they may have (or not have at all!) out-of-band management interfaces, they may or may not boot over network or support booting from (virtual) DVD. Each environment is different and requires individual approach.
In this first post from the series of 3 I demonstrate the easiest option for BareMetal node scale-out on OpenShift. It fully relies on BareMetal integration and use of VirtualMedia.
The outputs and examples are taken from my virtualised lab where I simulate baremetal hosts using virtual machines and using Sushy tools (https://github.com/openstack/sushy-tools) to add Redfish capabilities to it.
Few assumptions
I assume the cluster is installed with Agent Based Installer (https://docs.openshift.com/container-platform/4.16/installing/installing_with_agent_based_installer/preparing-to-install-with-agent-based-installer.html) with BareMetal platform type. Clusters with user-provisioned infrastructure require additional validation and configuration to use the Machine API.
Clusters with the infrastructure platform type none cannot use the Machine API. This limitation applies even if the compute machines that are attached to the cluster are installed on a platform that supports the feature. To view the platform type for your cluster, run the following command:
# oc get infrastructure cluster -o jsonpath='{.status.platform}'
BareMetal
I also assume the environment is connected to Internet, however performing this exercise in disconnected/air-gapped environment should be similar.
Scaling-out the compute nodes with virtual media support.
This scenario covers the case where you have servers with out-of-band interface supporting virtual media. In my case it is Redfish provided by Sushy tools but it should work with any out-of-band management interfaces supporting virtual media. Virtual media feature allows you to mount ISO image and boot server from it. With that you don’t have to bother about burning physical discs or booting servers over network with PXE. It is quite easy and clean way to provision new servers and add them to the existing OpenShift cluster.
Let’s confirm the initial state of the cluster. It has three nodes which are performing control plane and worker roles:
# oc get nodes,machines,bmh
NAME            STATUS   ROLES                         AGE   VERSION
node/master-0   Ready    control-plane,master,worker   3d   v1.30.4
node/master-1   Ready    control-plane,master,worker   3d   v1.30.4
node/master-2   Ready    control-plane,master,worker   3d   v1.30.4

NAME                                               PHASE     TYPE   REGION   ZONE   AGE
machine.machine.openshift.io/ocp4-l2k5k-master-0   Running                          3d
machine.machine.openshift.io/ocp4-l2k5k-master-1   Running                          3d
machine.machine.openshift.io/ocp4-l2k5k-master-2   Running                          3d

NAME                               STATE       CONSUMER              ONLINE   ERROR   AGE
baremetalhost.metal3.io/master-0   unmanaged   ocp4-l2k5k-master-0   true             3d
baremetalhost.metal3.io/master-1   unmanaged   ocp4-l2k5k-master-1   true             3d
baremetalhost.metal3.io/master-2   unmanaged   ocp4-l2k5k-master-2   true             3d
Setting network configuration for the new node
If your node has a single NIC and the IP configuration is obtained via DHCP that’s easy and you can skip to the next paragraph. However for most of scenarios that’s not the case. Very often there are multiple NICs which are supposed to be configured as bonds, use of the tagged VLANs or there is no DHCP in place and IP configuration has to be statically applied. When you were installing your cluster using Agent Based Installer, you probably came across agent-config.yaml file (https://docs.openshift.com/container-platform/4.16/installing/installing_with_agent_based_installer/preparing-to-install-with-agent-based-installer.html#static-networking) which contains configuration of all nodes you’re deploying at the cluster installation time, including network configuration written in NMState format. Since deployment is already done, the file isn’t useful anymore and you have to provide network configuration individually for the each node. Luckily BareMetalHost resource allows to reference Secret with NMState configuration for the new node.
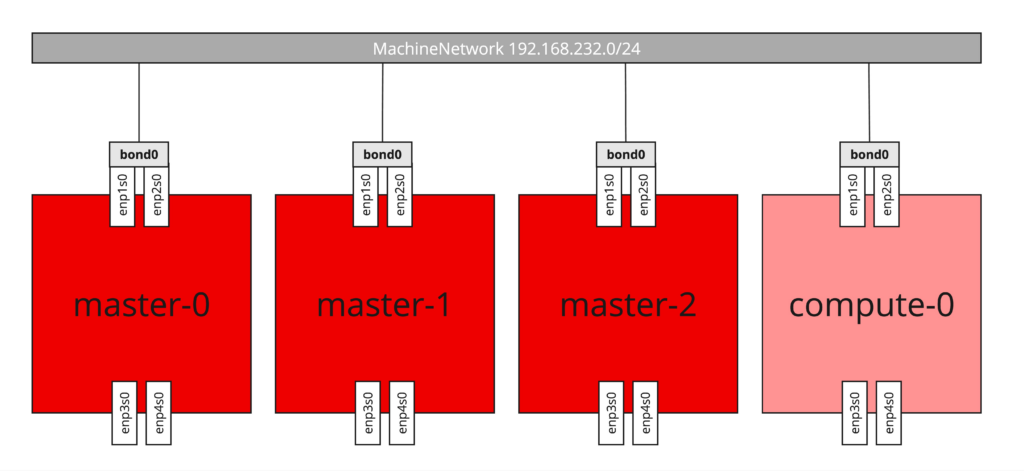
The full list of options including examples you can find at the official NMState project page: https://nmstate.io/. For the demo purposes I will configure bond interface with two physical NICs, using active-backup (Mode 1) bonding which does not require any integration at the switch side. Additionaly IP configuration is static, therefore each new node will require individual Secret with NMState configuration (WARNING: overlapping IP addresses ahead!). For more information about bonding and OpenShift, please refer to: https://docs.openshift.com/container-platform/4.16/networking/k8s_nmstate/k8s-nmstate-updating-node-network-config.html#virt-example-bond-nncp_k8s_nmstate-updating-node-network-config
Bellow is the content of Secret containing nmstate configuration for baremetal node:
apiVersion: v1
kind: Secret
metadata:
  name: compute-0-network-config-secret
  namespace: openshift-machine-api
type: Opaque
stringData:
  nmstate: |
    interfaces:
      - name: bond0
        type: bond
        state: up
        link-aggregation:
          mode: active-backup
          options:
            primary: enp1s0
          port:
            - enp1s0
            - enp2s0
        ipv4:
          dhcp: false
          enabled: true
          address:
            - ip: 192.168.232.103
              prefix-length: 24
      - name: enp1s0
        type: ethernet
        state: up
        ipv4:
          enabled: false
          dhcp: false
      - name: enp2s0
        type: ethernet
        state: up
        ipv4:
          enabled: false
          dhcp: false
      - name: enp3s0
        type: ethernet
        state: up
        ipv4:
          enabled: false
          dhcp: false
      - name: enp4s0
        type: ethernet
        state: up
        ipv4:
          enabled: false
          dhcp: false
    routes:
      config:
        - destination: 0.0.0.0/0
          next-hop-address: 192.168.232.1
          next-hop-interface: bond0
          table-id: 254
    dns-resolver:
      config:
        server:
          - 192.168.232.1
The command to create it is as follows:
# oc -n openshift-machine-api create -f compute-0.nmstate.secret.yaml
secret/compute-0-network-config-secret created
Configuring access to out-of-band management interface
Usually the out-of-band management interface needs some authentication what is a very good idea. Ultimately this interface grants unlimited access to the server, so it is always better to keep it properly secured. To enable Metal3 component of OpenShift cluster, which is based on Ironic project and responsible for management of baremetal servers, to access OOBM interface with authentication, I need to provide it with the Secret containing credentials. In this example, the Secret called compute-0-bmc-secret is stored in openshift-machine-api namespace. Username and password are “redfish” and “sushy”, just for an example 😉
# oc -n openshift-machine-api create secret generic compute-0-bmc-secret --from-literal=username=redfish --from-literal=password=sushy
secret/compute-0-bmc-secret created
Creating BareMetalHost resource
The BareMetalHost resource defines a physical host and its properties. For more information about it please refer to https://docs.openshift.com/container-platform/4.16/post_installation_configuration/post-install-bare-metal-configuration.html
Since I have both Secrets (NMState and OOBM credentials) created:
# oc -n openshift-machine-api get secrets | grep compute-0
compute-0-bmc-secret                        Opaque              2      1m
compute-0-network-config-secret             Opaque              1      1m
I can create BareMetalHost resource which will reference to these resources. The definition of BareMetalHost for compute-0 in my case looks like below:
apiVersion: metal3.io/v1alpha1
kind: BareMetalHost
metadata:
  name: compute-0
  namespace: openshift-machine-api
spec:
  automatedCleaningMode: metadata
  bmc:
    address: redfish-virtualmedia://192.168.232.1:8000/redfish/v1/Systems/80db3a4f-930c-4f5f-b4d0-cf18356fe9a5
    credentialsName: compute-0-bmc-secret
    disableCertificateVerification: true
  bootMACAddress: de:ad:be:ef:66:04
  bootMode: UEFI
  networkData:
    name: compute-0-network-config-secret
  preprovisioningNetworkDataName: compute-0-network-config-secret
  online: true
  rootDeviceHints:
    deviceName: "/dev/sda"
The comprehensive description of BareMetalHost resource can be found here: https://docs.openshift.com/container-platform/4.16/post_installation_configuration/post-install-bare-metal-configuration.html#the-baremetalhost-spec but for now please check the following:
- s
pec.bmc.address– this is telling Metal3 how to get access to your system’s OOBM interface, with what protocol, address and path (usually for single baremetal hosts it is/redfish/v1/Systems/1, however if you have blade system or something more sophisticated it can be different. Please refer to your server’s OOBM interface documentation) spec.bmc.credentialsName– this refers to the Secret I created earlier, which contains OOBM credentials to log inspec.bootMACAddress– this configures the MAC address that system is supposed to boot from. Since we’re not booting over network, this mac address is being used to confirm we’re working on the right server. If the NIC with the matching mac address won’t be found, the node will not be bootstrapped.spec.networkData– this is a reference to Secret with NMState configuration for that nodespec.preprovisioningNetworkDataName– is the name of the Secret containing network configuration which is passed to the preprovisioning image (Ironic Python Agent – IPA). It is being used for baremetal host introspection and provisioning. In this case it references the same Secret as spec.networkData, however there may be cases where it should be different, for an instance to isolate baremetal node from the cluster provisioning network.spec.rootDeviceHints– this configured disk drive which is supposed to be used to install RHCOS on. UsingdeviceNameisn’t the best idea since disk device names can change. For more details please see the BareMetalHost specification.spec.online– specifies power state of the node, since I want to actually do something with it, I need to ensure it is set to true and therefore it will be powered up.
Now I will create the BareMetalHost resource for compute-0 and watch the process it is being registered, introspected and added as available for cluster expansion:
# oc create -f compute-0.bmh.yaml
baremetalhost.metal3.io/compute-0 created

# oc get bmh -w
NAME       STATE       CONSUMER              ONLINE   ERROR   AGE
master-0   unmanaged   ocp4-l2k5k-master-0   true             3d
master-1   unmanaged   ocp4-l2k5k-master-1   true             3d
master-2   unmanaged   ocp4-l2k5k-master-2   true             3d
compute-0                                     true            0s
compute-0   registering                         true            0s
compute-0   registering                         true            72s
compute-0   inspecting                          true            72s
Introspecting new hardware
Once BareMetalHost resource is created, Metal3 will proceed automatically with the node introspection. Here is a high level overview of what’s happening behind the scene:
- Metal3 creates a temporary ISO RHCOS image with network configuration taken from NMState Secret built in
- Mounts the ISO using VirtualMedia feature, in this case with Redfish
- Configures the physical server to boot from virtual DVD
- Powers on the system
The system boots and starts introspection process to create inventory of hardware that the server is equipped with. The console of the system should show the node is booted from CoreOS image:

It is also a good moment to confirm that the node is actually being reachable over the network. This confirms that the network configuration defined in NMState Secret is working as expected. If it doesn’t you will waste your time waiting for the introspection timeout to occur.
# ping -c 5 192.168.232.103
PING 192.168.232.103 (192.168.232.103) 56(84) bytes of data.
64 bytes from 192.168.232.103: icmp_seq=1 ttl=64 time=2.53 ms
64 bytes from 192.168.232.103: icmp_seq=2 ttl=64 time=0.321 ms
64 bytes from 192.168.232.103: icmp_seq=3 ttl=64 time=0.344 ms
64 bytes from 192.168.232.103: icmp_seq=4 ttl=64 time=0.260 ms
64 bytes from 192.168.232.103: icmp_seq=5 ttl=64 time=0.290 ms

--- 192.168.232.103 ping statistics ---
5 packets transmitted, 5 received, 0% packet loss, time 4090ms
rtt min/avg/max/mdev = 0.260/0.749/2.533/0.892 ms
Since it looks good, I can sit back and watch the introspection process happening. The final state of the node should be “available” as on the screenshot below:
# oc get bmh -w
NAME       STATE       CONSUMER              ONLINE   ERROR   AGE
master-0   unmanaged   ocp4-l2k5k-master-0   true             3d
master-1   unmanaged   ocp4-l2k5k-master-1   true             3d
master-2   unmanaged   ocp4-l2k5k-master-2   true             3d
compute-0                                     true             0s
compute-0   registering                         true             0s
compute-0   inspecting                          true             11s
compute-0   preparing                           true             4m9s
compute-0   available                           true             4m10s
Once introspection is finished and node is in “available” state, I can query BareMetalHost resource to get insights from the introspection, for an instance to list network and storage hardware I run:
# oc get bmh compute-0 -o json | jq -r '.status.hardware | .storage,.nics'
[
  {
    "alternateNames": [
      "/dev/sda",
      "/dev/disk/by-path/pci-0000:06:00.0-scsi-0:0:0:0"
    ],
    "hctl": "0:0:0:0",
    "model": "QEMU HARDDISK",
    "name": "/dev/disk/by-path/pci-0000:06:00.0-scsi-0:0:0:0",
    "rotational": true,
    "serialNumber": "drive-scsi0-0-0-0",
    "sizeBytes": 107374182400,
    "type": "HDD",
    "vendor": "QEMU"
  },
  {
    "alternateNames": [
      "/dev/sdb",
      "/dev/disk/by-path/pci-0000:06:00.0-scsi-0:0:0:1"
    ],
    "hctl": "0:0:0:1",
    "model": "QEMU HARDDISK",
    "name": "/dev/disk/by-path/pci-0000:06:00.0-scsi-0:0:0:1",
    "rotational": true,
    "serialNumber": "drive-scsi0-0-0-1",
    "sizeBytes": 53687091200,
    "type": "HDD",
    "vendor": "QEMU"
  }
]
[
  {
    "mac": "de:ad:be:ef:66:04",
    "model": "0x1af4 0x0001",
    "name": "enp2s0"
  },
  {
    "mac": "de:ad:be:ef:66:04",
    "model": "0x1af4 0x0001",
    "name": "enp1s0"
  },
  {
    "mac": "52:54:00:e5:46:a4",
    "model": "0x1af4 0x0001",
    "name": "enp4s0"
  },
  {
    "mac": "52:54:00:c5:b6:1a",
    "model": "0x1af4 0x0001",
    "name": "enp3s0"
  },
  {
    "ip": "192.168.232.103",
    "mac": "de:ad:be:ef:66:04",
    "name": "bond0"
  }
]
Because I set spec.online to true, the node will remain running and waiting for being provisioned.
So just to confirm the current state of the cluster node related resources:
# oc get bmh,machines,nodes
NAME                                STATE       CONSUMER              ONLINE   ERROR   AGE
baremetalhost.metal3.io/compute-0   available                         true             10m
baremetalhost.metal3.io/master-0    unmanaged   ocp4-l2k5k-master-0   true             3d
baremetalhost.metal3.io/master-1    unmanaged   ocp4-l2k5k-master-1   true             3d
baremetalhost.metal3.io/master-2    unmanaged   ocp4-l2k5k-master-2   true             3d

NAME                                               PHASE     TYPE   REGION   ZONE   AGE
machine.machine.openshift.io/ocp4-l2k5k-master-0   Running                          3d
machine.machine.openshift.io/ocp4-l2k5k-master-1   Running                          3d
machine.machine.openshift.io/ocp4-l2k5k-master-2   Running                          3d

NAME            STATUS   ROLES                         AGE   VERSION
node/master-0   Ready    control-plane,master,worker   3d   v1.30.4
node/master-1   Ready    control-plane,master,worker   3d   v1.30.4
node/master-2   Ready    control-plane,master,worker   3d   v1.30.4
Provisioning new compute (worker) node.
So far nothing has been written down on the new server’s disk yet. It is powered on, running from the Live RHCOS ISO and waiting for the orders. Since I have all the goods from the integration with BareMetal platform available here, in order to start provisioning I just need to tell OpenShift that the expected number of worker nodes is 1 instead of 0. To do so I have to scale the preexisting MachineSet for worker nodes which now is set to 0:
# oc get machinesets
NAME                  DESIRED   CURRENT   READY   AVAILABLE   AGE
ocp4-l2k5k-worker-0   0         0                             3d

# oc scale --replicas=1 machineset ocp4-l2k5k-worker-0
machineset.machine.openshift.io/ocp4-l2k5k-worker-0 scaled

# oc get machinesets
NAME                  DESIRED   CURRENT   READY   AVAILABLE   AGE
ocp4-l2k5k-worker-0   1         1                             3d
The replica increase will start automated provisioning process. To observe the progress of deployment I run the commands below:
# oc get bmh -w
NAME        STATE       CONSUMER              ONLINE   ERROR   AGE
compute-0   available                         true             17m
master-0    unmanaged   ocp4-l2k5k-master-0   true             3d
master-1    unmanaged   ocp4-l2k5k-master-1   true             3d
master-2    unmanaged   ocp4-l2k5k-master-2   true             3d
compute-0   available   ocp4-l2k5k-worker-0-sv867   true             18m
compute-0   provisioning   ocp4-l2k5k-worker-0-sv867   true             18m
compute-0   provisioned    ocp4-l2k5k-worker-0-sv867   true             24m
# oc get machines -w
NAME PHASE TYPE REGION ZONE AGE
ocp4-l2k5k-master-0 Running 3d
ocp4-l2k5k-master-1 Running 3d
ocp4-l2k5k-master-2 Running 3d
ocp4-l2k5k-worker-0-sv867 0s
ocp4-l2k5k-worker-0-sv867 Provisioning 0s
ocp4-l2k5k-worker-0-sv867 Provisioned 5m38s
ocp4-l2k5k-worker-0-sv867 Running 10m
The server will reboot few times and after it should report back as provisioned.
Please note: my virtualised server boots pretty quickly compared to the “real” physical servers, as the boot proces of them may take even 10 minutes or longer.
# oc get bmh,machines,nodes
NAME                                STATE         CONSUMER                    ONLINE   ERROR   AGE
baremetalhost.metal3.io/compute-0   provisioned   ocp4-l2k5k-worker-0-sv867   true             28m
baremetalhost.metal3.io/master-0    unmanaged     ocp4-l2k5k-master-0         true             3d
baremetalhost.metal3.io/master-1    unmanaged     ocp4-l2k5k-master-1         true             3d
baremetalhost.metal3.io/master-2    unmanaged     ocp4-l2k5k-master-2         true             3d

NAME                                                     PHASE     TYPE   REGION   ZONE   AGE
machine.machine.openshift.io/ocp4-l2k5k-master-0         Running                          3d
machine.machine.openshift.io/ocp4-l2k5k-master-1         Running                          3d
machine.machine.openshift.io/ocp4-l2k5k-master-2         Running                          3d
machine.machine.openshift.io/ocp4-l2k5k-worker-0-sv867   Running                          23m

NAME             STATUS   ROLES                         AGE   VERSION
node/compute-0   Ready    worker                        20m   v1.30.4
node/master-0    Ready    control-plane,master,worker   3d   v1.30.4
node/master-1    Ready    control-plane,master,worker   3d   v1.30.4
node/master-2    Ready    control-plane,master,worker   3d   v1.30.4
And that’s it! The new node has been successfully added to the cluster. Thanks to the integration with underlying baremetal infrastructure, the whole process was fully automated and seamless. I just had to ensure that provided Secret resources with respective configurations are correct (BareMetalHost, NMState and OOBM credentials secrets).
Removing node from the cluster
Decommissioning of the node is even easier as I need just to decrease the number of replicas in MachineSet definition. There is however one important thing to keep in mind – policy which is being used to determine what node (Machine) should be deleted. The default is Random, meaning that random machines are chosen and deleted when scaling compute machine sets down. The other supported deletion options are Newest and Oldest.
For an instance in case of MachineSet scale down, if I want to delete the recently added node to the system, I have to set MachineSet‘s spec.deletePolicy to Newest:
# oc get machinesets
NAME                  DESIRED   CURRENT   READY   AVAILABLE   AGE
ocp4-l2k5k-worker-0   1         1         1       1           3d

# oc patch machineset ocp4-l2k5k-worker-0 --type='json' -p='[{"op": "replace", "path": "/spec/deletePolicy", "value":"Newest"}]'
machineset.machine.openshift.io/ocp4-l2k5k-worker-0 patched
If however I want to specify particular node (Machine) for deletion regardless of MachineSet deletePolicy in use, I can annotate it with machine.openshift.io/delete-machine=true, for an instance:
# oc get machines
NAME                        PHASE     TYPE   REGION   ZONE   AGE
ocp4-l2k5k-master-0         Running                          3d
ocp4-l2k5k-master-1         Running                          3d
ocp4-l2k5k-master-2         Running                          3d
ocp4-l2k5k-worker-0-sv867   Running                          35m

# oc annotate machine ocp4-l2k5k-worker-0-sv867 machine.openshift.io/delete-machine=true
machine.machine.openshift.io/ocp4-l2k5k-worker-0-sv867 annotated
It doesn’t really make sense here since there is only one worker node in the cluster, but in real life scenarios it is pretty useful.
Now when I decrease number of replicas of MachineSet managing my compute nodes as bellow:
# oc scale --replicas=0 machineset ocp4-l2k5k-worker-0
machineset.machine.openshift.io/ocp4-l2k5k-worker-0 scaled
OpenShift will take care of the automated node decommission process.
Please note: if you simply delete Node resource from the cluster, the data remains on the disks. So if you simply restart it (or Kubelet running on it) the node will join back the cluster. However in case of this method, Metal3 takes care of node cleanup as well. It will follow the process configured in spec.automatedCleaningMode which can be:
metadata(the default) enables the removal of partitioning tables from all disksdisableddisables the cleaning process
Therefore please be aware that with the default configuration all partitioning tables from all disks will be removed!
The progress of node decommission can be observed with the following commands:
# oc get nodes -w
NAME        STATUS   ROLES                         AGE    VERSION
compute-0   Ready    worker                        54m   v1.30.4
master-0    Ready    control-plane,master,worker   3d    v1.30.4
master-1    Ready    control-plane,master,worker   3d    v1.30.4
master-2    Ready    control-plane,master,worker   3d    v1.30.4
master-2    Ready    control-plane,master,worker   3d    v1.30.4
compute-0   Ready,SchedulingDisabled   worker                        54m   v1.30.4
compute-0   NotReady,SchedulingDisabled   worker                        55m   v1.30.4
# oc get bmh -w
NAME STATE CONSUMER ONLINE ERROR AGE
compute-0 provisioned ocp4-l2k5k-worker-0-sv867 true 2h
master-0 unmanaged ocp4-l2k5k-master-0 true 3d
master-1 unmanaged ocp4-l2k5k-master-1 true 3d
master-2 unmanaged ocp4-l2k5k-master-2 true 3d
compute-0 provisioned ocp4-l2k5k-worker-0-sv867 false 2h
compute-0 deprovisioning ocp4-l2k5k-worker-0-sv867 false 2h
compute-0 available ocp4-l2k5k-worker-0-sv867 false 2h# oc get machines -w
NAME PHASE TYPE REGION ZONE AGE
ocp4-l2k5k-master-0 Running 3d
ocp4-l2k5k-master-1 Running 3d
ocp4-l2k5k-master-2 Running 3d
ocp4-l2k5k-worker-0-sv867 Running 2h
ocp4-l2k5k-worker-0-sv867 Deleting 2hAnd just a final look at the cluster state, please note compute-0 BareMetalHost became available again, it means we can provision it easily just by increasing number of replicas for worker MachineSet:
# oc get bmh,machinesets,machines,nodes
NAME                                STATE       CONSUMER              ONLINE   ERROR   AGE
baremetalhost.metal3.io/compute-0   available                         false            2h
baremetalhost.metal3.io/master-0    unmanaged   ocp4-l2k5k-master-0   true             3d
baremetalhost.metal3.io/master-1    unmanaged   ocp4-l2k5k-master-1   true             3d
baremetalhost.metal3.io/master-2    unmanaged   ocp4-l2k5k-master-2   true             3d

NAME                                                  DESIRED   CURRENT   READY   AVAILABLE   AGE
machineset.machine.openshift.io/ocp4-l2k5k-worker-0   0         0                             3d

NAME                                               PHASE     TYPE   REGION   ZONE   AGE
machine.machine.openshift.io/ocp4-l2k5k-master-0   Running                          3d
machine.machine.openshift.io/ocp4-l2k5k-master-1   Running                          3d
machine.machine.openshift.io/ocp4-l2k5k-master-2   Running                          3d

NAME            STATUS   ROLES                         AGE   VERSION
node/master-0   Ready    control-plane,master,worker   3d   v1.30.4
node/master-1   Ready    control-plane,master,worker   3d   v1.30.4
node/master-2   Ready    control-plane,master,worker   3d   v1.30.4
Summary
Scaling-out BareMetal compute nodes in OpenShift can be very easy. The most challenging part from my point of view is just to set the correct network configuration. Failing to do so may result in long troubleshooting (how long would you wait for introspection timeout before you start getting worried?). If you have out-of-band-management interface which supports Redfish, IPMI or other proprietary protocol with VirtualMedia you can boot your server from, it is just as easy as it would be in cloud.
If however your servers or environment configuration don’t allow you to take the easy way, please look at the other two posts from this series:
- Scaling OpenShift compute (worker) BareMetal nodes – Part 2: manual node bootstrap process with ISO
- Scaling OpenShift compute (worker) BareMetal nodes – Part 3: bootstrapping nodes over network with PXE